
How Do I Get My Sensor Clean?

How To Determine If Your Sensor is Dirty
It is often difficult to see the spots on your images caused by dust for various reasons. If the images are dark, or if the focus blends them out, you may not see them clearly. Also the software built into the camera may compensate a little for these imperfections in your image and filter them out. But eventually you will notice them and they will take away from your images.
There are a few options available to help detect whether there is dust on your sensor. The best way to detect dust is by using the VisibleDust Sensor Loupe™. With its vivid array of lights and clear 5x magnification K9 lens, it is the easiest way to detect any contamination on your sensor. Also available is the SensorScope from Delkin that helps detect dust, but not as efficiently as the Sensor Loupe™. Last but not least is the 'f/22' test. To ascertain if you have any dust particles on your sensor using this method:

- Make sure there is a lens on the camera.
- Set the focus to the longest focal length (infinity).
- Set the exposure compensation to +1 (if possible).
- Set the aperture to the smallest value (largest number i.e. f22, f32 -- hence the name).
- Shoot off a few pictures aimed at a light (preferably white) backdrop with a uniform background and consistent lighting. For example: a picture of the sky on a clear day/blank (white) document on a computer screen.
- Examine the images by zooming in on them in your on camera LCD preview screen or your favourite image browser after you have uploaded them to your computer. If possible, open the images in Photoshop and set the channels to Autolevels (Image>Adjustments>Autolevels). This will help bring out the contrasts a bit.
- If you see any blurs, or blatantly black spots, chances are you have debris on your sensor filter. It is usually easy to determine after many shots if you have dust because the spots remain in the same place while the perspective has changed.
How Do I Remove The Debris From My Sensor?
Now that you have determined, beyond a reasonable doubt, that there is debris on your sensor, you fundamentally have three options available to you.
- 1) Send To Repair Shop/Manufacturer For Cleaning
- 2) Ignore The Problem
- 3) Fix The Problem Yourself
Send To Repair Shop/Manufacturer For Cleaning
This is a practical option if you have any reservations about your ability to clean your camera yourself. The liability will rest on the technician and any damages incurred should be covered by the manufacturer or repair shop, but it may be a good thing to verify this beforehand. Unfortunately, it does come at some cost: usually US$50+. If your camera gets dirty frequently, it could be very costly after some time. Another factor to take into consideration is downtime. It could take up to 2-3 weeks for your camera to be returned and if you rely on your camera, as professional photographers do, this may not be feasible. One last consideration to ponder is that there is no guarantee from the manufacturer/repair shop that all the debris will be removed.
Ignore The Problem
As silly as this sounds at first, it actually is not that absurd. A lot of the time any anomalies caused by the debris will not show up in your images. Irregularities caused by debris do not show up well in low light images, and may be 'erased' by software interpolation (to some extent). Also these anomalies, if they do show up, can be touched up by imaging software such as Adobe Photoshop. It breaks down to a matter of tolerance.
Fix The Problem Yourself
Warning: Manufacturers do not advocate cleaning the camera sensor and any undertaking to do so will most undoubtedly void your warranty. Sensorcleaning.com and its agents shall not be held liable for any damage whatsoever, which may arise as a result of the information appearing on this website.
Cleaning the sensor with your own hands may sound like a daunting task, but in reality it's not that difficult. First and foremost you're not cleaning the sensor directly but rather the low pass filter/optical glass that sits in front of the sensor. Granted, this can be damaged as well but with patience, due care, attention, and the proper materials, one should easily be able to achieve their goal.
- As a good starting point it is best to wash your hands. This will minimize the likelihood of any contaminants falling into the chamber area while working on the camera.
- As mentioned in the where section, it is best to find a relatively secluded area, with a large area table and minimal air currents. It may be best to give the table a wipe down, just for good measures.
- Next, we remove the lens from the camera. It is best if you have a lens case or lens covers to protect the lens while it is unattached. This will also reduce the possibility of the lens attracting dust that will later get transferred into the chamber of the camera.
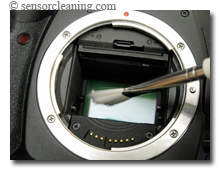
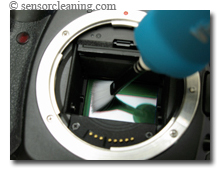
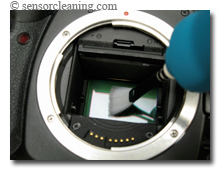
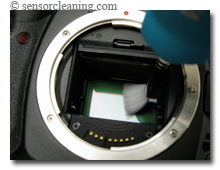
- Now we will expose the sensor. All digital SLR cameras have a mode built into their menu which mechanically lifts the mirror and opens the shutter, providing access to the sensor. We have comprised a list of manuals from different camera manufacturers for your convenience. Each listing provides the page number where the directions can be found in each manual to lock the mirror/shutter.
- Now that we have the camera chamber fully exposed, we should take some time to examine the area. It is best practice to clean this region frequently as well as the sensor because dust will accumulate here and eventually be transferred to the sensor. It should be noted that cameras with self cleaning mechanisms do so by passing a piezoelectric current through the filter, shedding the dust back into the chamber area. To clean the chamber area, its is suggested to use a firm cotton tipped swab and a solution suited for the job. Take great precaution not to make contact with the sensor area at this time, as you could transfer contaminants such as dust, solution, or lubricant.
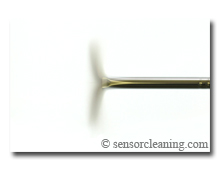
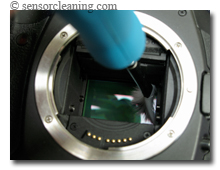
- Closely examine the sensor. We have found that the best way to examine the sensor is using the Sensor Loupe™ from VisibleDust. For the most part, the debris on your sensor filter will most likely be dust and require what we like to describe as a 'dry cleaning.' On rare occasion, if there is moisture build up, a stain/smear from lubricant, or a stubborn piece of dust that will not budge, it is suggested to do a 'wet cleaning.' Determining what kind of problem you have will help initiate your next step. If you think you may have a moisture build up, lubricant stain, or an anchored piece of dust, it is best to start off with a 'wet cleaning' and then finish off with a 'dry cleaning.' If you are confident that it is just dust on your sensor, then a 'dry cleaning' should be sufficient.
- A 'dry cleaning' can be accomplished in a variety of ways, although some are better then others and are a matter of preference. Some manufactures have advocated the use of what is called a blower bulb. These devices are basic rubber bladders that intake air and when squeezed, blow the air out its intake valve. While these are okay and relatively safe, it has been suggested that these devices tend to stir the dust around and not remove it completely. Another method that has been gaining popularity is the use of a brush to clean the sensor. These are not typical brushes that sweep the dust across your sensor filter, but more so attract dust to the brush away from the sensor. These types of brushes are charged by passing air, from a compressed air can, through the specially formed bristles or, more conveniently, by spinning them rapidly using a specially built device. The brush is then passed over the sensor, from one end to the other. The process can be repeated as many times as needed, making sure to clean/recharge the bristles each time.
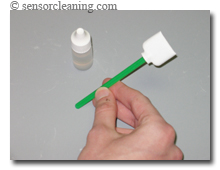
- A 'wet cleaning' entails using a proper swab and an appropriate solution. Apply the recommended amount of solution to the swab, allowing for time to absorb, and then firmly but gently swipe the swab over the sensor, making sure to pass completely over the entire sensor. Repeat as many times as necessary using a clean swab each time.
- If you are confident that the sensor has been cleaned to the best of your ability it is time to reassemble your camera. Unlock the shutter and mirror as described in your manual. Next, carefully replace your lens back onto the camera. It is not a bad idea to do a lens cleaning at this point but this is beyond the scope of this article.
- Now that your camera is fully reassembled, it is the moment of truth. As described at the beginning of this page, take some test snapshots with your camera and assess how effect the cleaning was. If needed, repeat all the steps once again until you are pleased with the results.
'Dry Cleaning'
 |
 |
|
| Spin the brush to recharge the bristles and remove any previous debris. | After recharging bristles, insert brush width to width of sensor. | |
 |
 |
|
| Rotate and gently rest bristles on far edge of sensor. | Lightly draw the bristles over the width of sensor. | |
 |
 |
|
| Do not apply too much pressure. | Lift from sensor, rotate brush width to width of sensor and remove. | |
|
||
| Spin the brush to remove any debris that has been collected. |
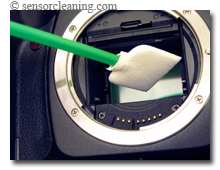
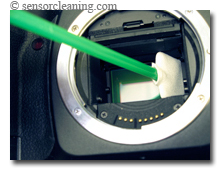
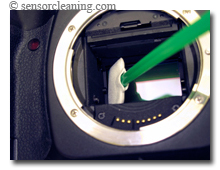
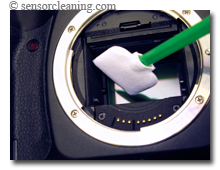
'Wet Cleaning'
 |
 |
|
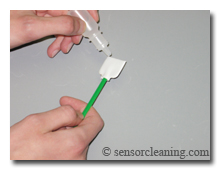
| Discard swab wrapping. (suggest blowing off with bulb blower to remove any fibers that may have shed in transport) | Apply cleaning liquid evenly across edge, taking precaution not to oversaturate the swab. | |
 |
 |
|
| Insert swab width wise to the width of the sensor. Rotate once inside chamber. | Contact sensor so that swab width is edge to edge of the height of sensor. | |
 |
 |
|
| Wipe (gently, firmly) across width of sensor, edge to edge. | Lift off sensor, rotate swab width to width of sensor and remove. |
RECOMMENDATIONS:
What we will focus on here is the liquids and swabs used to remove any unwanted stains or smears that may appear on your sensor.
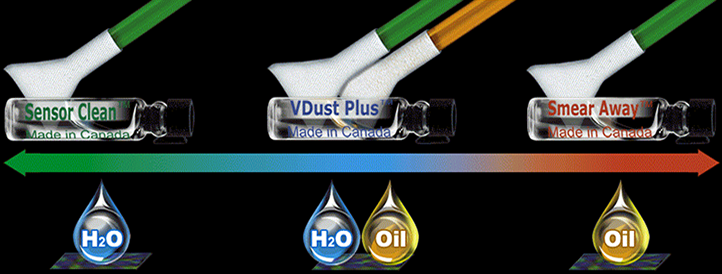
Sensor Clean™ - This product is best suited for the removal of water based stains on your sensor. It provides an anti-static barrier for the prevention of dust accumulation, it has anti-fogging capabilities and prevents streaking as it cleans. If you intend to work in a humid or arid climate, Sensor Clean™ will provide a buffer against vapour build up and dust collection.
VDust Plus™ - This solution fits in the middle ground where it will clean both water based stains and light oil based stains. If you are unsure as to the nature of the particular stain or smear that you have on your sensor, VDust Plus™ is an excellent choice. It provides great cleaning ability and provides a moderate anti-static barrier.
Smear Away™ - This concoction is the strong sensitive type. It will remove any tough stains that finds their way onto your sensor safely and effectively. As it cleans, Smear Away™ acts as a buffer to prevent any hard and potentially harmful dust particles from scraping against the IR filter. It provides excellent dust repellent properties and prevents friction build up. Due to the nature of some tough oil stains, it may leave minor streaks behind and a follow up with Sensor Clean™ is usually an excellent measure.
Swabs - VisibleDust has produced two distinstive types of swab due to the varying consistancies of the cleaning liquids we offer, though after time we realized that the green series swabs could be used effectively with all of our solutions.
DHAP (orange) Sensor Cleaning Swabs - Specifically designed to be used with our VDust Plus™ solution, the DHAP swabs also work well with our Smear Away™ liquid. The unique woven pattern increases absorbency while reducing fiber shedding. The ultra soft material used in making the swab is the same that is used to clean extremely sensitive surfaces such as high powered space telescopes. This delicate fabric is ideal for critical cleaning since less pressure is received by the sensor, minimizing any abrasive action when coming in contact with any hard debris.
MXD-100 (green) Sensor Cleaning Swabs - The multi-fabric design of the green swabs make them compatible with all of our sensor cleaning solutions: Sensor Clean™, VDust Plus™, and Smear Away™. Although the MXD-100 swabs are a little thicker than the DHAP, they are still softer than our competitors.
| Streak Prevention: | The ability to prevent streaks after cleaning. Removing debris from the sensor only to find streaks left behind can be frustrating. |
| Anti-Static: | The ability to prevent dust attraction to the filter surface after cleaning. After cleaning the filter it is desirable to have an anti-static barrier to reduce dust attraction in the future. |
| Cleaning Power: | The ability to remove water, oil and protein. The water that appears on the sensor usually comes from humidity, raindrops, and spittle. Oil appears on the sensor when it is cast from the mechanisms (mirror, shutter) or from accidental contact with the IR filter with a finger. Proteins and bacteria can accumulate in the form of dust (ie pollen) or from breathing or spitting on the filter. |
| Smear Removal Power: | The ability to remove lubricant contamination from the sensor surface. Smears occur when a liquid contamination develops on the filter and an attempt is made to clean it with a dry method such as a brush. This spreads the contaminant over the sensor creating a 'smear.' Smears sound detrimental but are easily removed with the proper tools. |